
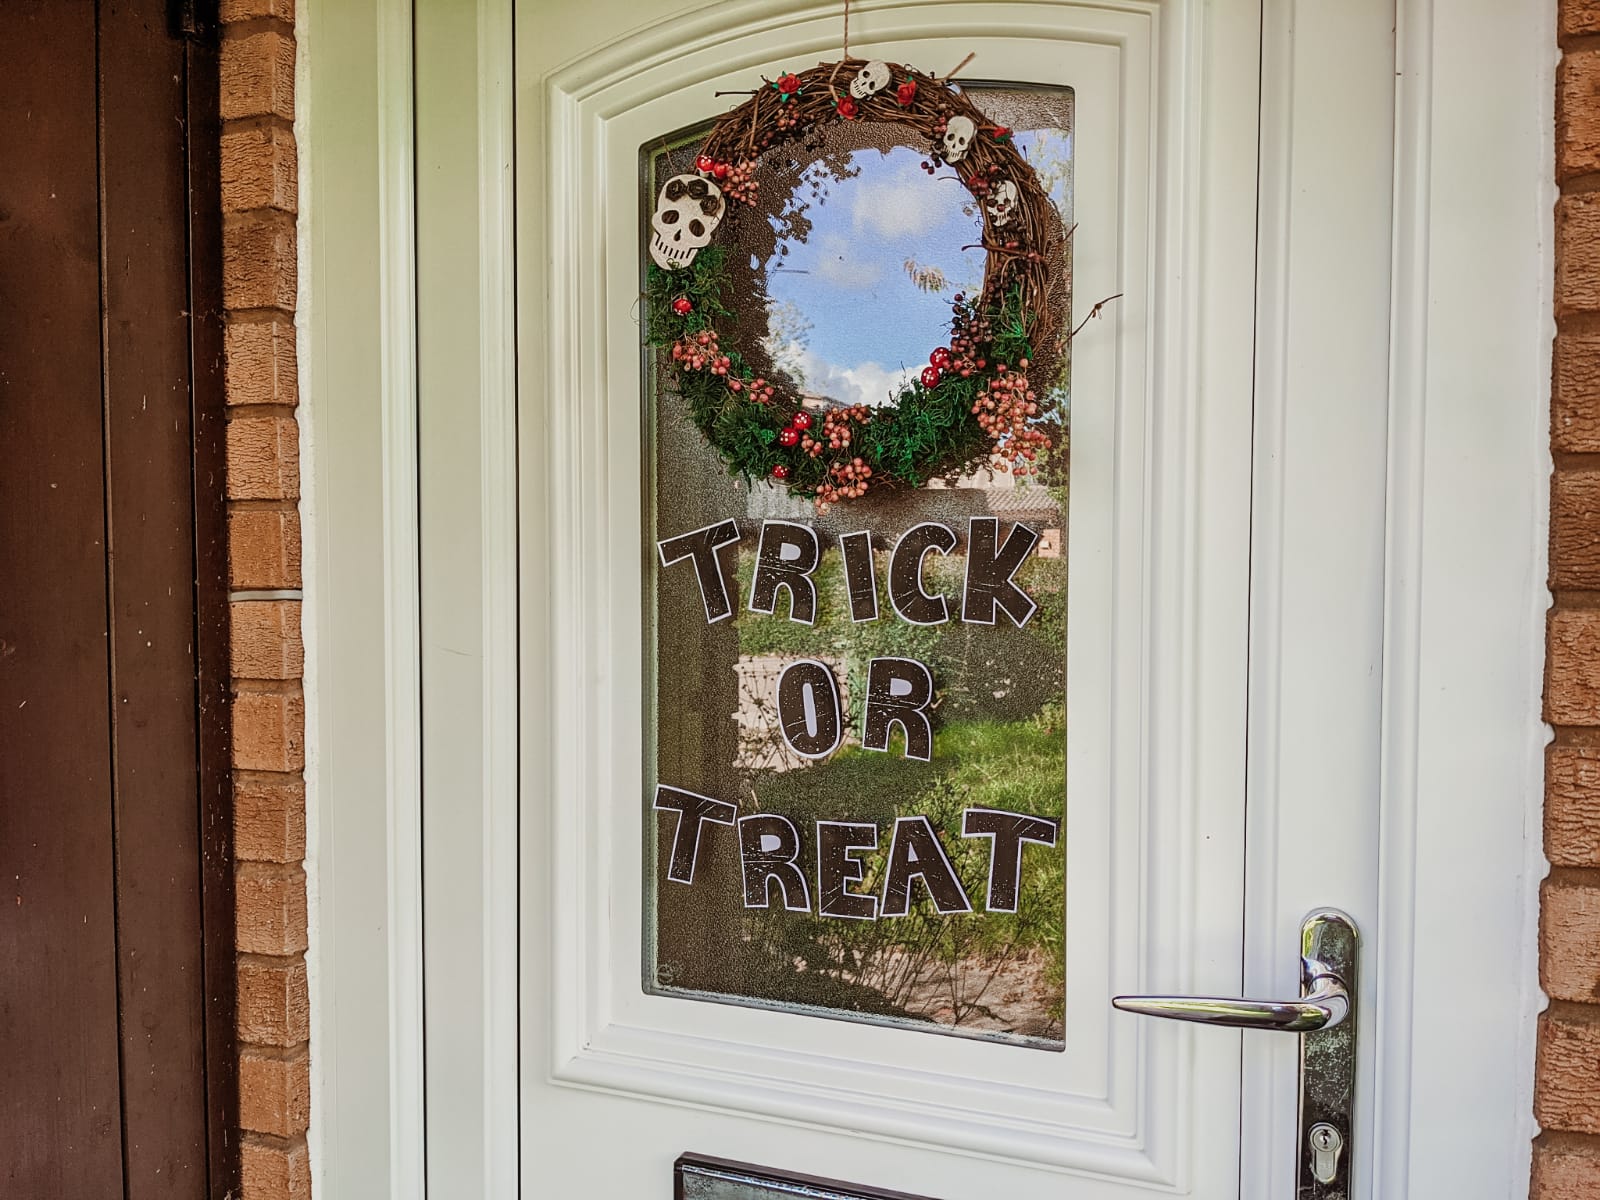
It’s the most spooky time of the year – so I made a homemade Halloween wreath for our front door, complete with some Halloween lettering!
One of the best things about finally having my own place is definitely being able to go overboard with Halloween/autumn decor! Autumn into winter is definitely my favourite time of year. Even when I lived back at my parents’ house, I’d constantly be buying Halloween accessories. Now, they’re definitely coming in handy, since there’s only so much we can do to make our rented house homely!
One thing I’ve always wanted to do is make a homemade Halloween wreath for our front door. And make our front door look inviting with Halloween accessories. The bonus of doing it yourself too is that it saves money and means your creations are entirely unique.

I had a look at some ideas online but generally decided to wing it. I did find Hobbycraft’s website to be quite useful though so got most of my supplies from there.
Once I purchased a wreath base from Hobbycraft, I realised it was quite small. I was worried it may look a little lost on our door. I haven’t yet had the chance to get a pumpkin and I don’t have a lot of money to spend on an autumn welcome mat. So I decided to think out of the box and head over to Font Bundles. Looking through their collection of handwriting fonts, I decided a cool Halloween phrase would sit nicely beneath my wreath. I found a free Halloween font quite easily! Although I did spend a good while scrolling through the website and looking at other Halloween graphics.
Using the font was super easy. I simply downloaded the folder, unzipped/extracted it, and typed the desired writing into Word. Then I played around with a few different sizes. I printed off a couple of test run letters to hold up to the door (beneath the wreath), before deciding on the ideal size. Next, I printed it out, cut out each letter individually and I was done!

I simply stuck the lettering to the door with blue tack and it’s stayed secure since. Later, once I completed the wreath, I was worried that the wreath might blow away. Luckily it hasn’t!
I bought most of the bits for the wreath from Hobbycraft too. I spent just under £20 in the end. Which isn’t too bad for Hobbycraft – but in the end didn’t even use everything I’d purchased. Luckily, alongside their wreaths, Hobbycraft had an entire section with wreath-making must-haves. This included moss, wiring to attach items to the wreath and dried oranges. Dried orange slices are very popular at the moment. I planned to do these myself at home to save money, but entirely forgot to buy some. In the end however, I think they would have been a bit too much.
I decided to make my wreath an autumn-into-Halloween wreath. Starting with the autumn part, I covered moss on the bottom half of the wreath, reaching up into the top half. I added soft pink berries and little foam mushrooms to this area. This was just the right amount for such a small wreath, I think. I didn’t actually buy any wiring and kind of just stuck the moss on. The mushrooms and berries had little ‘stems’ so they managed to weave in well.
Read more: 31 scary movies to watch this October (on Netflix)

I did plan to go out on a walk to collect some bits too, but didn’t need to in the end!
For the Halloween part, I focused on a few little wooden skulls I’d found in Hobbycraft. Originally I wanted to paint them or spray-paint the base of the wreath black. But in the end, I didn’t think this would work with the autumn area. So I coloured in the skulls with some white crayons. I’d picked up some gold flowers too but they didn’t quite work. So I spray-painted some black and added them to one of the larger skulls to look like a flower crown! I also had lots of berries left over. I loosely spray-painted these black and I really like how this turned out. Some of them you can still see the pink so it links the Halloween section and autumn section well. Finally, I added some red flowers too.

Overall I’m really pleased with the wreath and quite proud of myself! The only struggles I had was attaching the skulls as I didn’t have any wiring or strong glue. In the end, I found some extra strong sticky bits I’d bought for attaching photo frames to walls, and once pressing down quite hard, this worked.

The first time I put the wreath up, I used a suction cup with a hook directly into the back of the wreath and it immediately fell down. I then found some string in my craft box and used that to hang off a suction cup instead. I also added a couple extra behind the wreath for extra security and it’s been fine so far.


Hanging the wreath above the funky Halloween text resulted in a really great effect. I like how it’s a mix of autumn and Halloween, but the lettering also makes it clear that we’re huge Halloween fans in this house!
Overall, I really, really love it but what I love the most is that I did it all myself! It only took me a couple of evenings to do and it was really nice to get creative and crafty again. I’ll definitely be doing this again next year – and perhaps something similar for Christmas!
What do you think of my homemade Halloween wreath? Do you prefer the autumn or Halloween part of the wreath? What spooky phase would you make in lettering for your front door? Let me know!
Disclaimer: This review is based on my personal experience with a product/service that was provided to me free of charge. Despite the complimentary nature of this experience, all opinions expressed in this review are 100% my own and I am under no obligation to share a review.


No Comments